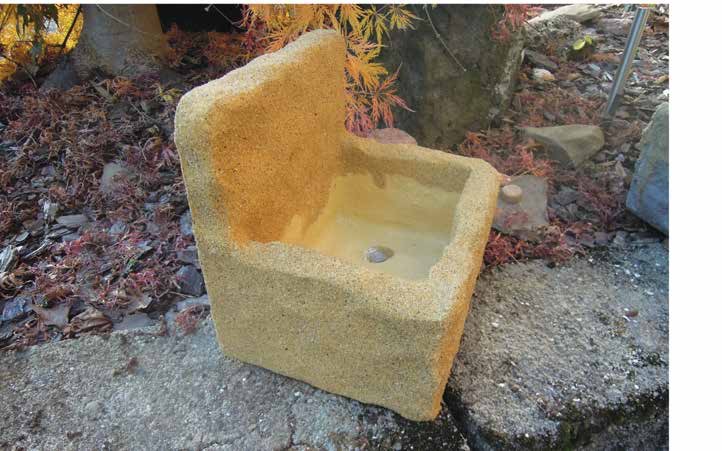
I started usIng styrofoam for troughs many, many years ago when I saw a 1997 article in the Scottish Rock Garden Club journal, The Rock Garden. As I understood the article the Styrofoam boxes' surfaces were simply roughed and painted. I made a number of such troughs and they did well. The light weight and good weathering properties made them winners. I'm sure there have been many modification since then -- mine is one of the many.
Materials Needed
1. Styrofoam box – walls 1-inch-plus thick. I find a good source of these boxes are pediatricians. In the article from Scotland, it was clear that in Aberdeen the best source was fish-boxes. Every locality will have its own most-likely source.
2. Propane torch or heat gun
3. Masonry Paint – Latex Base, Drylok Masonry Waterproofer®. Get this at Home Depot or Lowes and they will tint it for you at no charge to a brown color.
4. Sand sized at 14 to 28 mesh (0.05 to 0.025 inches). This is probably much closer-sized than necessary, but the final product looks best with the fines (dust size) and the material over 1/16 inch removed. But this is a personal preference.
5. Clear outdoor spray paint.
Procedure
Cut the box to a depth of 4 to 6 inches for typical rock garden type plants that do not normally have deep root systems. Adjust the box depth to accommodate the plants. Shape the box as you desire.
With the torch lightly pass the flame across the top edge, the bottom, and four sides of the box until you have attained the surface you desire. The bottom and the inside surfaces are torched simply to harden the surfaces.
Then apply the Drylok Masonry paint to the bottom and all inside surfaces and allow them to dry.
Then apply the paint to an outside surface and immediately apply the sand generously.
Let the surface dry (usually for 24 hours) and then proceed with the next surface. For esthetic purposes be sure to extend the paint/sand treatment a couple of inches down inside the box.
After the finished trough has dried spray paint the final product with a couple of coats of semi-gloss clear spray paint – it helps glue the sand on.
Next fill and plant your trough!
Thoughts
As you can tell from all this, making a Styrofoam trough is not instant. It takes a few days but it is easy and you have a trough that is extremely lightweight and has excellent insulation properties, and has proven to be weather-resistant. I have some planted Styrofoam troughs that are over 15 years old.
An interesting characteristic of these troughs compared to hypertufa troughs is that these will not dry out nearly as quickly, as the sides are not going to transpire. This means less diligence in watering, especially for those plants requiring sun, and thus a more constant moisture level in the planting medium..... but you can over water! To avoid over watering be sure Styrofoam troughs have a somewhat coarser soil mix assuring good drainage.
Because Styrofoam is an excellent insulator the temperature does not fluctuate so rapidly in the winter or summer, thus keeping the roots/ plants happier. Also, because the sides are sand, and thus rather sharp, slugs are a minor problem.
Finally, unlike hypertufa troughs that require aging to harden the cement and a lot of rinsing to reduce the lime-bleed from the cement, Styrofoam troughs are ready to use immediately after being completed! If like me, you are impatient to get your trough planted having put in the work making it, then this is a real bonus.
Remember you are only limited by imagination and the size of Styrofoam box you can get hold of. Good Luck!
Some ABC’s of Cultivating Plants in Troughs
Troughs are actually small self-contained gardens.
Troughs provide an opportunity to grow some exciting plants
in controlled environments.The smallest gems can be better appreciated, will have a better chance of surviving, and they can be elevated well above ground level – nice for the back and knees!
SOIL MIXES
A good general mix:
1 part typical potting mix – peat based
1 part coarse sand
1 part pea gravel
1 part medium perlite -- If you do not use the perlite add an additional 1⁄2 part of sand
For scree plants
1 part typical potting mix – peat based 1 part coarse sand
1 part pea gravel
2 parts medium perlite
For woodland plants
3 parts typical potting mix – peat based 1 part coarse sand or medium perlite
If weight is a concern you can keep the final trough light by using a lot of perlite in your planting mix (up